
Offboarding and employee separation
How to manage employee exits in Factura HRMS: create a separation, track clearance and the exit interview, follow statuses and export reports.
Overview
The Employee Separation Management module provides a structured, end-to-end process for managing employee departures — from initial request through to final settlement. It supports:
- Six separation types — Resignation, Termination, Retirement, End of Contract, Redundancy, Death
- Multi-step workflow — Draft > Pending Approval > In Progress > Clearance > Final Pay > Completed
- Automated reassignment — Direct reports, workflow approver roles, and pending tasks are reassigned on approval
- Clearance task management — Department-specific checklists generated from templates
- Exit interview capture — Structured survey with satisfaction ratings, reasons for leaving, and feedback
- Status history & audit trail — Chronological record of all status changes with timestamps and actors
- Analytics dashboard — Summary cards and breakdown tables by type, department, and status
- Excel export — Professional export of grid data for reporting
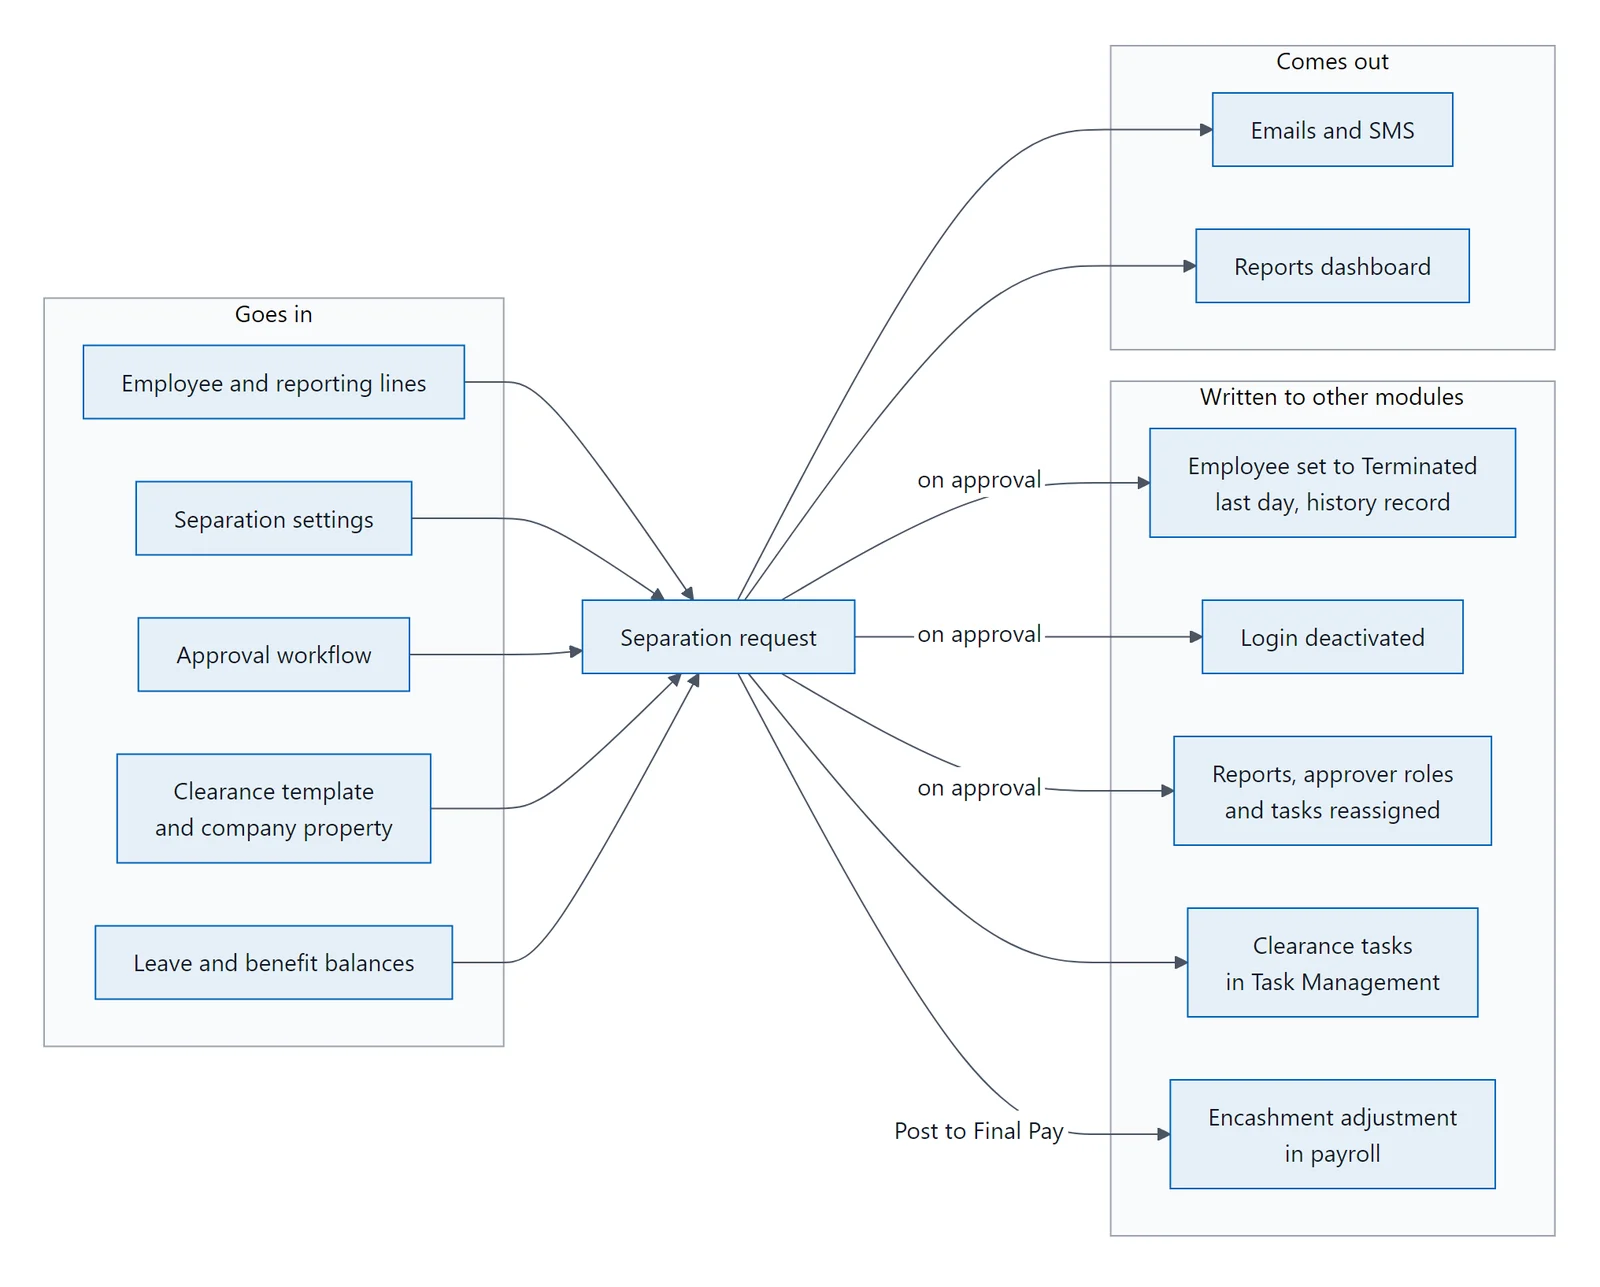
How data flows: employee data, settings, approvals, templates and leave balances go in; on approval the employee, login, reporting lines and payroll are updated.
Articles in this guide
- How do I get started with offboarding?Click Offboarding under Transactions in the left sidebar.
- How do I find my way around the separation list?The Offboarding list has 4 tabs ; All Cases, Active and Archive show a count pill in the tab heading: On the…
- How do I create a separation?From the list view, click + Add Separation at the top right of the page The New Separation Request form opens…
- What are the separation statuses?Each separation request progresses through a defined lifecycle: Final approval sets the employee to…
- How is the separation form laid out?The v2 edit form replaces the old multi-tab pattern with a single workspace organised as: Header bar — page…
- How do I preview reassignments for a leaver?When an employee is selected, the system automatically previews what needs to be reassigned: Direct Reports —…
- How does clearance work for a leaver?The CLEARANCE section appears in the workspace once the separation reaches In Progress (Status >= 2).
- How do I record an exit interview?The EXIT INTERVIEW section in the workspace captures structured feedback from the departing employee and lets…
- Where is the separation activity timeline?The FULL ACTIVITY TIMELINE card at the bottom of the workspace shows a chronological audit trail of all…
- Which buttons appear at each status?Action buttons appear at the bottom of the form and change based on the current status: Save — Save changes…
- Why is a separation read-only?Once a separation reaches Completed or Cancelled , the form becomes read-only automatically — a banner…
- Which offboarding reports are available?The Reports tab on the Separation List provides a dashboard with: Four cards across the top: Separations YTD…
- How do I export separations to Excel?The Export To Excel button is available on the All Cases and Archive tabs.
Help & FAQ
In-app FAQ accordions (where present) cover the same topics as Section 18 of this guide. The v2 redesign relies primarily on the stepper, CTA strip, and Completion Steps sidebar to communicate state, so most "what do I do next" questions are answered inline.
Common Use Cases
Use Case 1: Employee Resignation
Scenario: An employee submits a resignation letter with 30 days notice.
- Navigate to Transactions > Offboarding and click + Add Separation
- Select the employee, set Type to Resignation
- Set Last Working Date to 30 days from today
- Set Notice Period to 30, Notice Served Date to today
- At Pending Final Pay, choose Encash or Forfeit for each line under Leave & Benefit Settlement, then click Post to Final Pay
- Select reassignment targets for Direct Reports, Workflow Roles, and Tasks
- Click Save, then Submit for Approval
- Approver reviews and clicks Approve
- System automatically reassigns reports, transfers workflow roles, and revokes access
- Clearance tasks are generated — IT collects laptop, Finance settles advances, etc.
- Once all clearance tasks complete, process final pay via Run Final Pay
- Click Mark Complete to close the separation
Use Case 2: Termination for Cause
Scenario: Following a disciplinary process, HR initiates a termination.
- Create a new separation with Type = Termination
- Set Termination Reason to the appropriate category
- Set Last Working Date to today (immediate effect)
- At Pending Final Pay, choose Forfeit for each applicable line under Leave & Benefit Settlement
- Uncheck Garden Leave (immediate departure)
- Submit and approve through the workflow
- System executes all automated actions immediately
- Skip clearance if assets were already collected during the disciplinary process
- Process final pay and mark complete
Use Case 3: Retirement
Scenario: An employee reaches retirement age and the separation is planned months in advance.
- Create a separation with Type = Retirement, Last Working Date = retirement date
- Set a long notice period (e.g., 90 days)
- At Pending Final Pay, choose Encash for each applicable line under Leave & Benefit Settlement, then click Post to Final Pay
- Submit early for approval to allow time for proper handover
- After approval, clearance tasks provide a structured handover checklist
- Conduct the Exit Interview to capture institutional knowledge
- Process final pay including any retirement benefits
- Mark complete
Use Case 4: End of Contract (Fixed-Term)
Scenario: A fixed-term employee's contract expires.
- Create separation with Type = End of Contract
- Set Last Working Date to the contract end date
- No notice period typically required — set to 0
- Submit and approve
- Standard clearance and final pay process
Use Case 5: Redundancy (Retrenchment)
Scenario: Organizational restructuring requires position elimination.
- Create separation with Type = Redundancy
- Document the reason thoroughly in Termination Reason
- Set notice period per labour law requirements
- At Pending Final Pay, choose Encash for each applicable line under Leave & Benefit Settlement, then click Post to Final Pay
- After approval, complete clearance tasks
- Ensure final pay includes statutory redundancy compensation
- Mark complete
Use Case 6: Death of Employee
Scenario: An employee passes away.
- Create separation with Type = Death
- Set Last Working Date to the date of death
- The Exit Interview tab is automatically hidden (not applicable)
- Submit and approve
- Clearance focuses on recovering company assets from next of kin
- Final pay is directed to the employee's beneficiary/estate
- Mark complete
Use Case 7: Cancelling a Separation
Scenario: An employee rescinds their resignation, or a termination decision is reversed.
- Open an In Progress or Pending Clearance separation
- Click Cancel Separation
- The system:
- Reverts the employee's status to Active
- Cancels any pending clearance tasks
- Records the cancellation in the History tab
- Note: Reassignments already executed (direct reports, workflow roles) are NOT automatically reversed — manual correction may be needed
Permissions & Visibility
| Role | Access Level |
|---|---|
| HR Administrator | Full access — create, edit, approve, complete all separations |
| Department Manager | View department separations, participate in clearance tasks |
| Employee | View own separation status (via ESS dashboard widget) |
Access is controlled via:
- Security role permissions — View and Create rights on the Separation module, granted per role
- Company isolation — all data is kept separate for each company
FAQ / Troubleshooting
Q: Why can't I see the Clearance section?
The Clearance section only appears when the separation status is In Progress or beyond (Status >= 2). Draft and Pending Approval separations don't have clearance tasks yet.
Q: I generated clearance tasks but can't mark clearance complete — why?
Every non-cancelled clearance task must be assigned to someone and completed. An unassigned task counts as pending. Open each pending task via Open in Tasks, assign an owner, and complete it — or use Skip Clearance to bypass the checklist. See Section 8.4.
Q: Where do I edit the list of clearance activities?
The five standard activities come from the per-company "Separation Clearance" task template. An administrator edits it in the Task Management module; changes apply to separations generated afterwards. See Section 8.2.
Q: Why is the Exit Interview section missing?
The Exit Interview section is automatically hidden for Death-type separations (Type = 6), as exit interviews are not applicable.
Q: I clicked Send Invitation but got "No one could be notified" — why?
No recipient could be resolved. Add a staff attendee or external email with a valid address, or tick Also send SMS for staff who have a mobile number on record. Note external guests receive email only. See Section 9.2.
Q: Does the departing employee need to be added as an attendee?
No. The departing employee is always invited automatically. You only add the interviewer, panel members, or external guests.
Q: Can I edit a Completed separation?
No. Completed and Cancelled separations are fully read-only. All form fields and action buttons are disabled.
Q: What happens to the employee's access when a separation is approved?
The system automatically deactivates the user account associated with the employee, revoking their login access to the system.
Q: Can I reverse a completed separation?
No. Once marked as Complete, a separation cannot be reversed. If an error was made, a new employee record would need to be created.
Q: What if no approvers are configured for the workflow?
If no approvers are configured, the system falls back to auto-approve behavior — the separation moves directly to In Progress status upon submission.
Q: How do I see all separations including completed ones?
Click the All Separations tab in the list view. This shows the complete history including Completed and Cancelled records.
Q: Can multiple separations exist for the same employee?
No. Only one active separation (not Completed or Cancelled) can exist per employee at a time. The system validates this on creation and returns an error if a duplicate is attempted.
Q: Where do I process the final payroll?
Click the Run Final Pay button on a Pending Final Pay separation. This navigates to the payroll module with the employee pre-selected for a final settlement run.
Last updated: 17 June 2026 Module version: v2 (6-step stepper, CTA strip, 8+4 layout, Completion Steps sidebar)