
How do I create a leave request?
Step 1: Navigate to Leave Requests
- Click Transactions in the left sidebar.
- Select Leave Request from the submenu.
- You are taken to the Leave Requests list page.
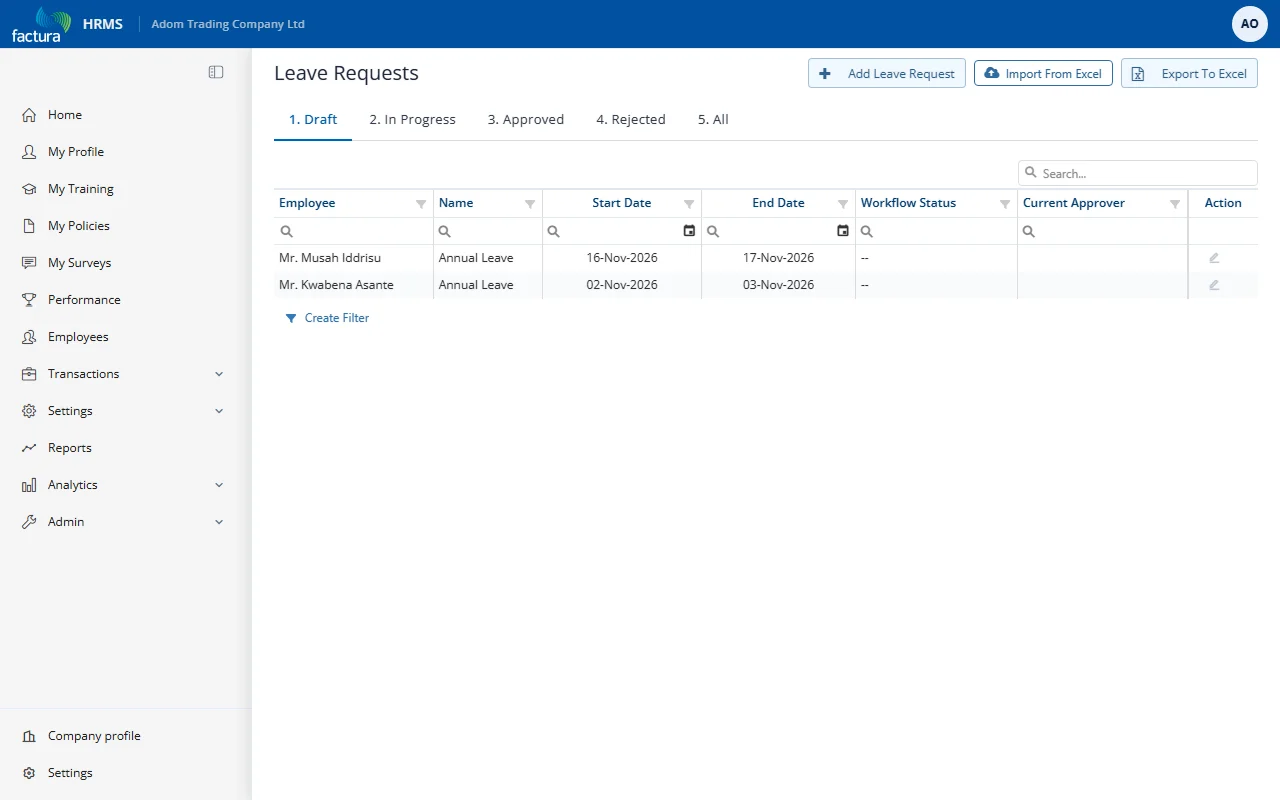
The list page has tabs to filter requests by status:
- 1. Draft -- Requests saved but not yet submitted
- 2. In Progress -- Requests submitted and awaiting approval
- 3. Approved -- Requests that have been fully approved
- 4. Rejected -- Requests that were rejected or cancelled
- 5. All -- All requests regardless of status
Each row shows the employee name, absence type, start date, end date, workflow status and current approver. Click the pencil icon in the Action column to open a request. The page header also offers Import From Excel and Export To Excel.
Step 2: Create a New Leave Request
- Click + Add Leave Request at the top right of the page.
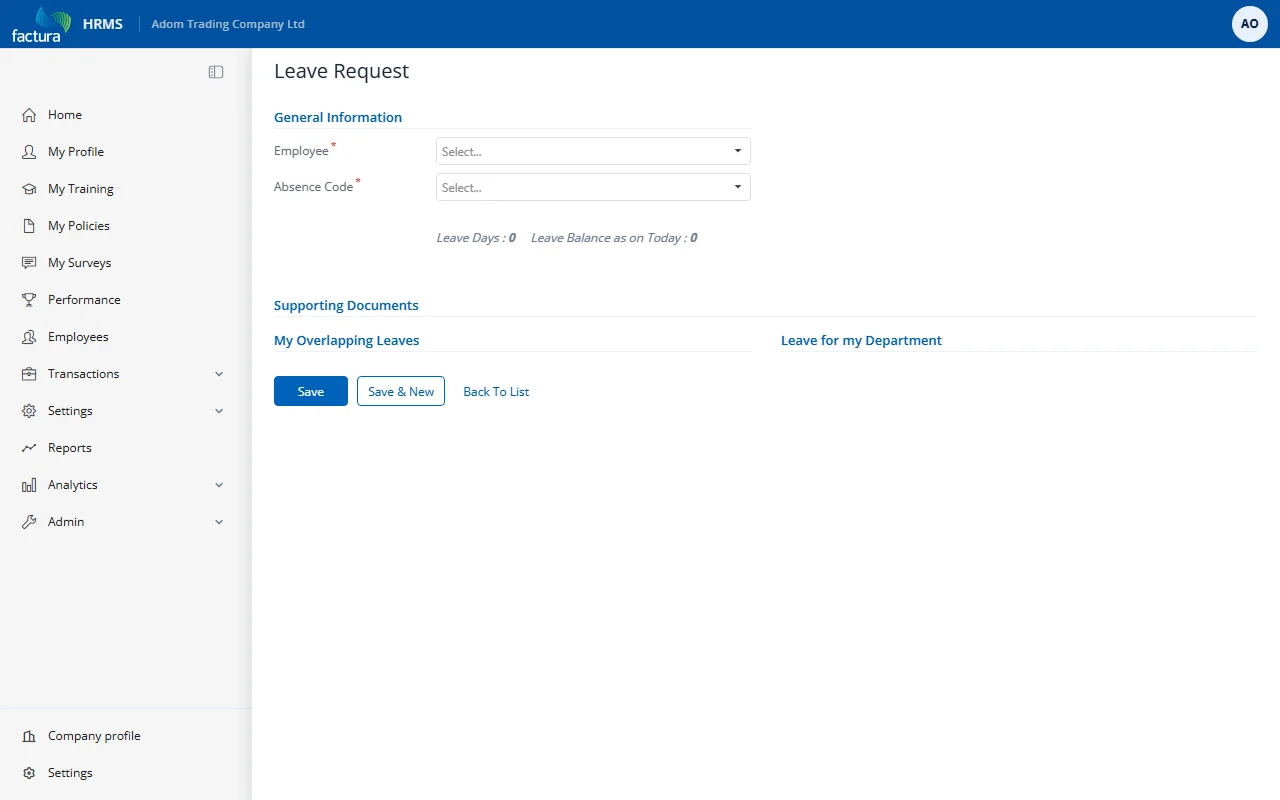
- Select the Employee from the dropdown.
- Select the Absence Code (leave type) from the dropdown.
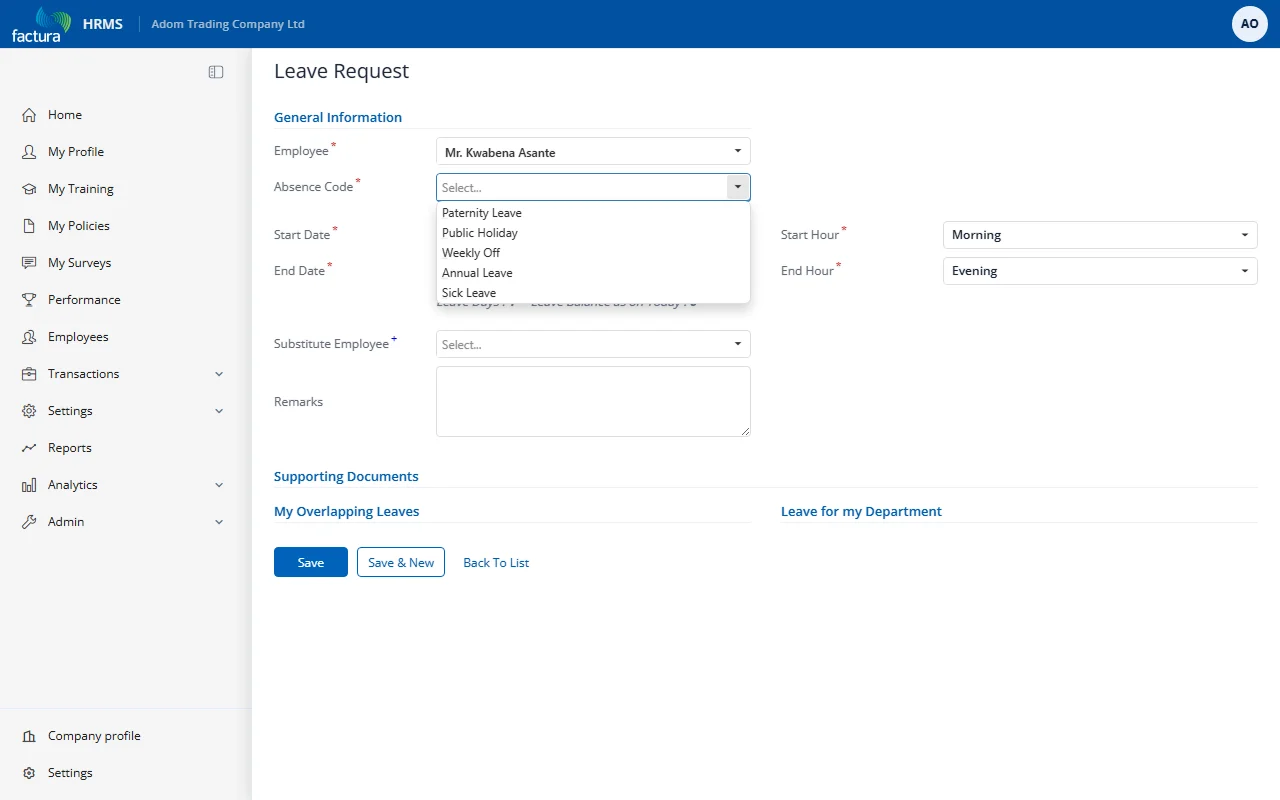
The dropdown shows only the leave types assigned to the selected employee (e.g., Annual Leave, Sick Leave, Study Leave, Maternity Leave).
- The General Information section shows the employee and absence code, with the dates, Leave Days and Leave Balance as on Today below them. Start Hour and End Hour appear once the dates are entered:
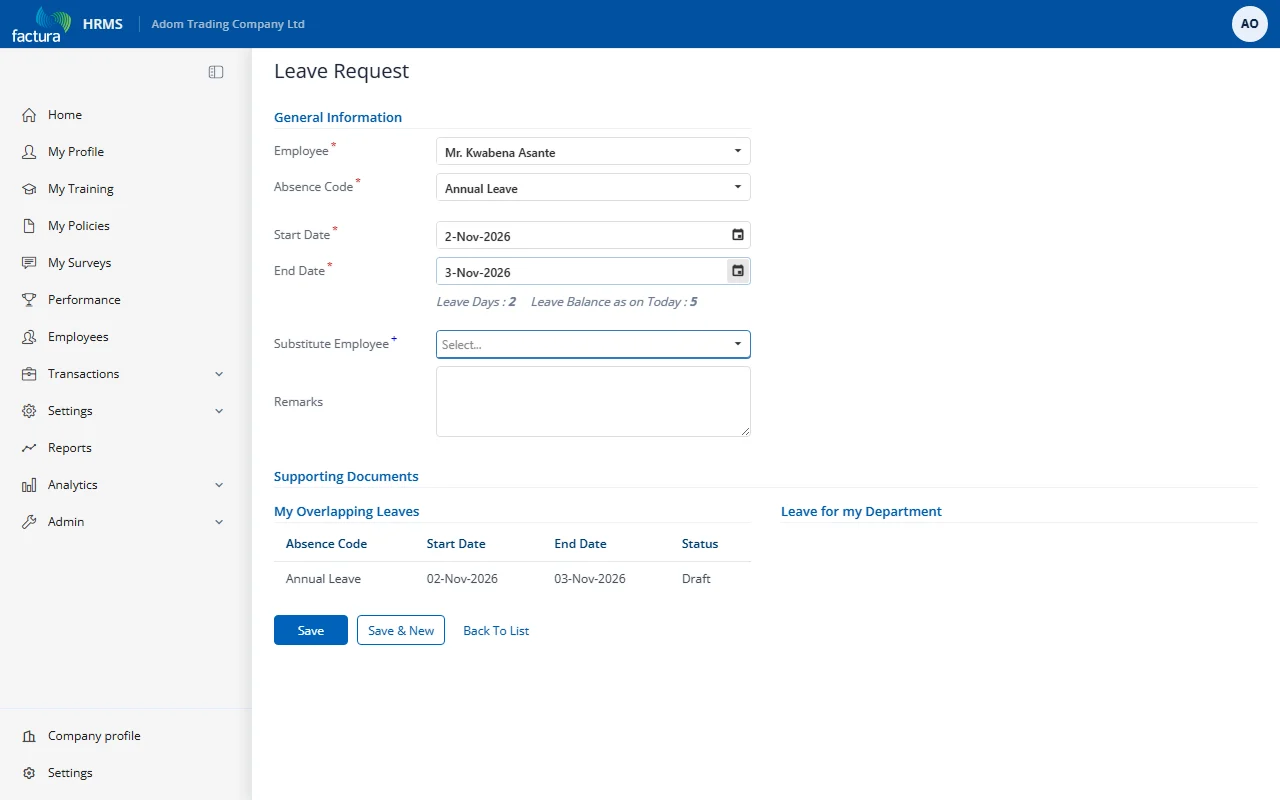
- Fill in the remaining fields:
| Field | Required | Description |
|---|---|---|
| Employee | Yes | The employee requesting leave |
| Absence Code | Yes | The type of leave (Annual, Sick, Study, etc.) |
| Start Date | Yes | The first day of leave |
| End Date | Yes | The last day of leave |
| Start Hour | Yes | When the leave starts on the first day: Morning, Lunch time, or Evening. Use this for half-day leaves. |
| End Hour | Yes | When the leave ends on the last day: Morning, Lunch time, or Evening. Use this for half-day leaves. |
| Leave Days | Auto | Shown beneath the dates. Automatically calculated based on the date range and hour selections. Accounts for weekends and holidays. |
| Leave Balance | Auto | Shown as "Leave Balance as on Today" beneath the dates: the employee's current available balance for the selected absence code |
| Substitute Employee | Depends on settings | Select a colleague who will cover responsibilities during the absence |
| Remarks | No | Additional notes or reason for the leave request |
- (Optional) Upload supporting documents (e.g., medical certificate for sick leave) using the document upload area.
- Click Save to save the request as a Draft.
Understanding Half-Day Leaves
The Start Hour and End Hour fields allow you to request partial-day leave:
| Scenario | Start Hour | End Hour | Result |
|---|---|---|---|
| Full day off | Morning | Evening | 1 full day |
| Morning off only | Morning | Lunch time | 0.5 day |
| Afternoon off only | Lunch time | Evening | 0.5 day |
| Multi-day with half-day start | Lunch time | Evening | First day is half, rest are full |
| Multi-day with half-day end | Morning | Lunch time | Last day is half, rest are full |
Step 3: Review and Submit
After saving, open the draft from the 1. Draft tab (pencil icon). The form shows the complete draft with all details and an AI Insights button that gives an AI-generated review of the request:
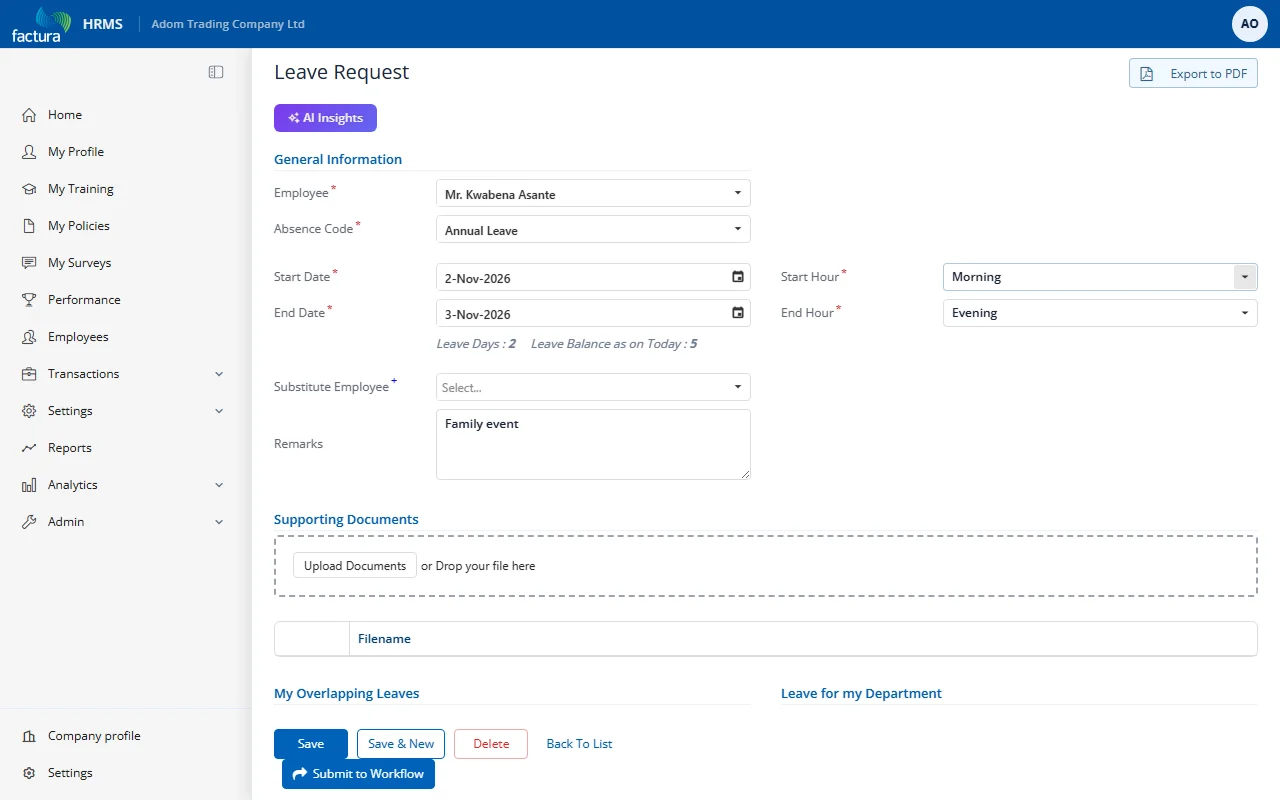
Review the following sections before submitting:
| Section | Description |
|---|---|
| My Overlapping Leaves | Shows any existing approved or pending leave that overlaps with the requested dates. Helps avoid double-booking. |
| Leave for my Department | Shows leave requests from other employees in the same department during the requested period. Helps managers identify staffing gaps. |
Step 4: Submit to Workflow
Once you are satisfied with the request:
- Click the Submit to Workflow button (blue button with arrow icon).
- The request is sent to the Level 1 approver(s) in the configured approval chain.
- The status changes from Draft to Submitted for Approval.
- The request moves from the Draft tab to the In Progress tab.
- An email and/or SMS notification is sent to the first approver(s).
Available Actions on a Draft Request
| Button | Description |
|---|---|
| Save | Save changes without submitting |
| Save & New | Save and immediately create another leave request |
| Delete | Delete the draft request entirely |
| Back To List | Return to the leave request list |
| Submit to Workflow | Send the request into the approval chain |